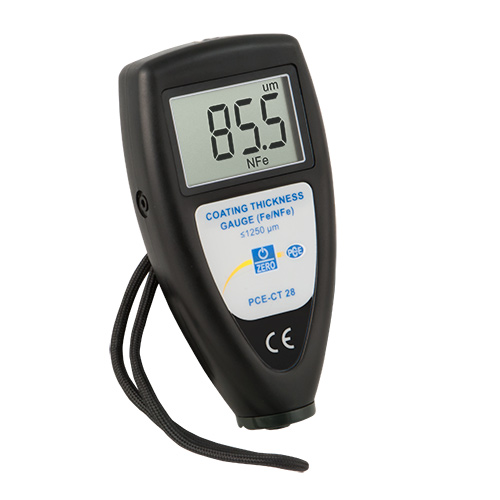
Coating Thickness Gauge PCE-CT 28
PCE-CT 28
Availability : กรุณาติดต่อสอบถาม
PCE-CT 28 Coating Thickness Gauge
Determines thickness of coating on steel or iron (F) / Non-ferrous metals (N) with high range of measurement
The PCE-CT 28 Coating Thickness Gauge for cars is for measuring the thickness of paint and plastic on ferrous or non-ferrous materials without damaging the coating’s surface. The Coating Thickness Gauge stands out due to its high range of measurement. This Coating Thickness Gauge works excellently as a tool for technicians in areas of paint or lacquering such as in production, automotive body repair or quality control. The Coating Thickness Gauge is particularly useful in detecting damage to vehicles produced by an accident, for preventing possible damage or as a toll in auto body repair. Also, in the industrial sector, this device is essential for quality control in shipping and receiving and during production. It is ergonomic with an integrated sensor and it shows results of measurements quickly and accurately. The Coating Thickness Gauge was designed for non-magnetic coatings such as plastic, chrome, zinc, copper, etc. and insulation such as rubber, plastic, glass and paper over steel, iron, aluminium, brass and stainless steel. Thanks to its wide measurement range, the Coating Thickness Gauge is ideal for the naval and metal industries.
– F / N: for materials including iron, steel, aluminium, copper, brass and stainless steel
– Instant results
– Large measurement range
– Vibrations do not influence readings
– Elastic lined measuring head to ensure accurate results and prevent wear
– The v-slot simplifies the measurement on round surfaces acting as a reference or axis point
– Can be operated comfortably with only one hand thanks to its design and integrated sensor
– Optional ISO calibration certificate
– Comes complete with battery, carrying case, calibration standards and user’s manual
| Measurement range | 0 … 1250 µm / 49.2 mils |
| Resolution | 0.1 µm / 0.004 mils (in a range of 0.0 to 99.9 µm / 3.9 mils) 1 µm / 0.04 mils(above the range) |
| Accuracy | ± 2% or 2.5 µm / 0.10 mils (highest reading is valid) |
| Minimum surface measurable | 6 mm x 6 mm / 0.2 in x 0.2 in |
| Minimum radial curve | convexed: 5 mm / 0.2 in concaved: 60 mm / 2.4 in |
| Minimum thickness of material | 0.3 mm / 0.01 in (for ferrous materials) 0.1 mm / 0.004 in (for non-ferrous materials) |
| Display | LCD with 4 mm x 10 mm (0.2 in x 0.4 in) high digits |
| Operating temperature | 0 … 50°C / 32 … 122°F |
| Power | 4 batteries |
| Dimensions | 126 x 65 x 27 mm / 5.0 x 2.6 x 1.1 in |
| Weight | 120 g / 0.26 lbs with batteries |
สินค้าที่เกี่ยวข้อง
เครื่องวัดความหนาผิวเคลือบ
PCE-CT 24FN
เครื่องวัดความหนาผิวเคลือบ
PCE-CT 5000H
เครื่องวัดความหนาผิวเคลือบ
มีความจำอัตโนมัติแยกสารที่เป็นเหล็กจากสารที่ไม่ใช่เหล็ก
เครื่องวัดความหนาผิวเคลือบ
PCE-CT 100N
เครื่องวัดความหนาผิวเคลือบ
Coating Thickness Measuring Device PCE-CT 22BT-ICA incl. ISO Calibration Cert.
PCE-CT 22BT-ICA
เครื่องวัดความหนาผิวเคลือบ
PCE-CT 26FN
เครื่องวัดความหนาผิวเคลือบ
Coating Thickness Gauge PCE-CT 27FN-ICA incl. ISO Calibration Certificate
PCE-CT 27FN-ICA
เครื่องวัดความหนาผิวเคลือบ
PCE-CT 100


